Monday 24 December 2018

Guide to Running Windows 10 Updates from Command Line

We all aware with the fact that Windows Update is the most emphasized features of the Windows 10. This is because, with the release of Windows 10, Windows was always offered to the customers as a service rather than any product. However, under the situation of Software as a Service, this will lead you to the Windows Updates on Windows 10 computer by default and also without giving any option for anyone to disable it. Thus, Microsoft provides this step for the customer’s greater goods or only customer’s profit as the Windows Update will always help the users to stay secure against all kinds of threats and also provide latest and greatest updates from the Microsoft.
windows_10
Here we will provide you with two methods which will help you in running Windows Update from Command Line on Windows 10. They are as follows:
  • Run Windows Update by Using Windows Powershell.
  • Run Windows Update by Using Command Prompt.

Steps to Run Windows 10 Updates from Command Line

Before starting the process, we advise you that follow the steps in ascending order to avoid damage and error, and it will take less time. Here how to run it:

Method-1: Run Windows Update by Using Windows Powershell

Running the Windows Updates with Windows Powershell will always require from you to manually install the Window Update module, manually downloaded the Get Windows Updates, and Install Windows Updates. And for doing this, you need to follow the below-given steps here how to do it by using Windows Powershell.
  1. Launch Windows Powershell by searching for Powershell in the Cortana search box.
  2. Then, click to run it with the Administrative level privileges.
  3. Next, type “Install-Module PSWindowsUpdate” to install the Windows Update module for Windows Powershell.
  4. Again, type “Get-WindowsUpdate” to connect to the Windows Update servers and if you found any updates then click to download it.
  5. Lastly, type “Install-WindowsUpdate” to install the Windows Updates downloaded on your computer system.

Method-2: Run Windows Update by using Command Prompt

Since Command Prompt exists on Windows operating system from very long time whereas the Windows Powershell is comparatively new one. Though it has almost similar capabilities to run the Windows Updates, here the highlighting point is that you don’t need to download any module for any Windows Updates.
  1. Firstly, launch Command Prompt by searching for the cmd in the Cortana search box.
  2. Then, run the Command Prompt with administrator level privileges.
  3. Next, click on the ‘Yes’ option for the UAC Prompt you get.
  4. Now, you need to type the following command and press the Enter key to perform the respective operations,
  5. Type “UsoClient StartScan” to start checking for the Updates.
  6. Then, type “UsoClient StartDownload” to start downloading the Updates.
  7. Now, type “UsoClient StartInstall” for installing the downloaded Updates.
  8. Again, type “UsoClient RestartDevice” to restarting your device after installing all the updates.
  9. To check, download and install Updates, type “UsoClient ScanInstallWait.”
Note: remember that commands mentioned above are only meant for Windows 10. For any older versions of Windows, you need to follow the below-given commands,
  1. Checking for any updates, type “wuauclt /detectnow.”
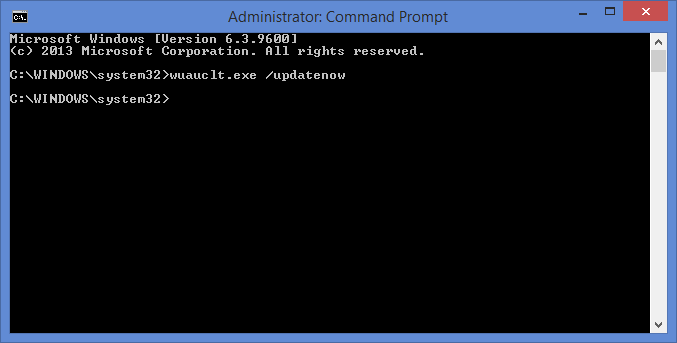
  2. For installing any detected Updates, type “wuauclt /updatenow.”
  3. For Checking download and install updates, type “wuauclt /detectnow /updatenow.”
Hopefully, these steps will help you in running the Windows Updates.
Billy Mark is a Microsoft Office expert and has been working in the technical industry since 2002. As a technical expert, Billy has written technical blogs, manuals, white papers, and reviews for many websites such as office.com/setup.

How to Fix ‘Slow Loading Downloads Folder’ in Windows 10?

Sometimes, many of you are experiencing that Downloads or any other library folder opens slowly as compared to some other folders. But you need not to worry, this is the most common issue, and it is experiencing by those users who are using the latest hardware like SSDs.
Slow downloading in widow 10
However, slow-loading signifies that when you try to open the folder, it will take a few seconds to display its content. Normally, it is accompanied by a green loading address bar says ‘Working on it’ which at times annoying for the users. This might seem weird to you because all other folders are opening very well. Hence, this problem might be occurring in both on normal hard drives and SSDs both.
While the major behind this “slow Loading download folder” is that the folders might have been optimized for screening photos or some other media formats. Thus, it sometimes takes a little while to load all the files and their thumbnails. But talking about downloads folder, it will contain all kinds of files such as documents, Zip files, audio/video files, etc., so that there is no any need to optimize this folder for media files. By doing this, you can make Windows File Explorer slow in loading its contents and also thumbnails which are non-existent for most of the files. Just take a look at how you can easily fix ‘Slow Loading Download Folder’ issue in Windows 10.
Steps to Fix ‘Slow Loading Download Folders’ Problem in Windows 10
  1. Before going further, make sure that you always have to use these steps in a given sequence. Here how to fix it:
  2. Initially, right-click on the ‘Download Folder’ in which you are experiencing slow-loading issue.
  3. Then, click on the ‘Properties’ option.
  4. Next, navigate to the ‘Customize’ tab.
  5. From the drop-down menu, click on the ‘Optimize this folder for’ option.
  6. Then, choose ‘General Items.’ By default settings, it must have been set to any Picture or Video.
  7. Alternatively, if any folder contains subfolders then choose ‘Also Apply This Template to All Subfolders.
  8. At last, click on the ‘Apply the Settings’ option followed by an OK tab.
  9. Finally, restart your computer system to save all the changes.
After completing the process, you can now make the folder content display faster than before. Thus, opening the Downloads folder would not take that much time. But always remember that these steps will apply to all kinds of folders on the Windows operating system.
Billy Mark is a Microsoft Office expert and has been working in the technical industry since 2002. As a technical expert, Billy has written technical blogs, manuals, white papers, and reviews for many websites such as office.com/setup.

Sunday 23 December 2018

How to Evaluate and Improve your Website?


Your website is the first thing that puts potential clients to connect with you. Unluckily, if it is not a good representation of your skills, or worse, filled with lots of errors, then site visitors will decide that it is better to look elsewhere for their services. However, if you take the initiative to continuously review your website and search for some different ways to make it the best, then you are engaging in active strategies that could convince potential clients for whom you have the services and expertise they need.


Keep reading to learn the way to perform an in-depth website evaluation as well as to enhance its layout and content.

1. Get Feedback from Volunteers
It’s an amazing idea to ask others to go to your site, check for grammatical mistakes and then give you feedback especially in cases when you didn’t rely on an outside company to build the site and have done everything by yourself. In self-built sites, and of course, you think that you have almost done everything to make it not just look good but also to function it smoothly.

2. Pay Attention to Negative Comments

Generally, websites have sections that consist of contact details, so that people can give compliments, ask their queries and make complaints. It’s great that to be a super active and maintain a habit of always writing back to each who decides to correspond with you. This step makes a person feel valued. Plus this gesture may encourage them to do business with you for the long term.

3. Depend on the ‘Grade My Website Tool’
Practically, it shouldn’t be your only goals that are making your site run as speedily as possible so the ‘free Grade My Website tool’ picks up where Google’s tool leaves you off. This tool looks at some of the components which include the title and description tags, URL construction and images, so it’s a fantastic resource for brushing your SEO strategy.

Note-Green checkmarks mean a particular part of the site is relevant while red Xs indicate things to fix. The evaluator also gives an overall grade which is very useful.

4. Streamline Website’s Structure
Always focus on how the content is structured and make sure that it’s genuinely sensible. You should arrange content, so its audience focused. You should also do what you can so website visitors can access content as few clicks as possible. One of the methods to do that is by using drop-down menus. To get good results to try to envision what visitors think after they read specific content on your site.

For instance, if by chance you post a blog entry related to the different types of crafts you make at home and then sell, it’s good to include a link to your contact page as part of motivating to action. In that way, people don’t have to click to visit another section of your website and can stay itself on the blog post and then access to what they need through your provided link.

Congratulations, you have learned to evaluate and improve your website.

Billy Mark is a self-professed security expert; he has been making the people aware of the security threats. His passion is to write about Cybersecurity, cryptography, malware, social engineering, internet and new media. He writes for Norton security products at office.com/setup.


Source : How to Evaluate and Improve your Website?

Fix OS X Bluetooth Wireless Problems


In the current times, users use at least one Bluetooth wireless peripheral with their Mac. Lots of people have a Magic Trackpad, and a Magic Mouse paired to desktop Mac; they also have wireless keyboards, phones, and speakers or else other devices connected via Bluetooth wireless. Bluetooth is very convenient not just for devices that are always connected to the Mac but also for those devices that are being only used on an occasional basis.

However, Bluetooth connectivity can also cause extremely annoying problems when things stop working as expected by the user. 


BLUETOOTH CONNECTION PROBLEMS-
Generally, most of the issues occur when a Bluetooth device that is paired with Mac unexpectedly suddenly stops working. Note that it may be listed as connected or it may not show up in the list of Bluetooth devices at all; in both the ways, the device doesn’t seem to work even a bit.

Most of the time users try ‘turning the Bluetooth device off and then back on’, although it may seem unhelpful to some people, in actuality that’s a perfect place to begin.

In some of the cases, it has been seen that this may not always work out so the user need to take an additional step, and try turning their Mac’s Bluetooth system off and then again back on. Those additional steps are given below- 

TURNING IT OFF AND THEN BACK ON:


1. Firstly, the user needs to ‘Launch System Preferences’ and then select the Bluetooth preference pane.

2. After that, the user needs to ‘Turn Bluetooth Off button.’

3. Then, the user needs to wait for some time and then require clicking the button again; note that it will have changed its text to read ‘Turn Bluetooth On.’

4. Remember that for easy access to the Mac’s Bluetooth system user do put a checkmark in the box labeled ‘Show Bluetooth’ in the menu bar.

5. Finally, the user must move ahead and see if their Bluetooth device is now recognized and working.


SOLUTION TO BLUETOOTH PROBLEMS-


There are innumerable things that can cause Bluetooth problems, but the one which has been addressed below is specific to two of the most common connectivity problems that can be experienced by many users:

1. The issue of Bluetooth devices that don’t seem to be able to pair with the Mac.

2. The next issue is of Bluetooth peripherals that get paired successfully but have stopped working.

Note that in both cases, the reason is likely to be corruption of the preference list which is used by Mac to store Bluetooth devices. The corruption stops your Mac from updating the data within the file or else from correctly reading data from the file. Remember that either of which can lead to the problems described above.

Luckily, the fix is an easy one: need to delete the bad preference list.

Hope, this blog would have been helpful for you.

Billy Mark is a creative person who has been writing blogs and articles about cybersecurity. He writes about the latest updates regarding mcafee.com/activate and how it can improve the work experience of users. His articles have been published in many popular e-magazines, blogs, and websites.


Source : Fix OS X Bluetooth Wireless Problems

Thursday 20 December 2018

Best Social Media Marketing Tips for This Holiday Season

Whenever Christmas or New Year comes, you have to face the flurry of attractive online deals, shopping advertisements all over the system screen.  These keep growing as the time approaches festive season. Everything ranging from big brands to small ones is competing with each other for the same space across the social media platform. They try to reach out to the massive customer audience and prompt them to act accordingly. If you are scrounging to separate your brand from the competition and cover the festive spirit in your social media posts during the Christmas, then here are some suggestions for you, as given below:
1.    Operate a Poll
Polls are an excellent way for social media marketing and they can be fun cum festive while also ending up with valuable and practical results. You can open with the comparisons of two or more products with each other or inquiring your followers about their opinion on something.
There is no bar for how long your poll will remain open, so your holiday options are innumerable. Facebook (FB) launched official polls for Newsfeed with the button to add GIF files in 2017.
2.    Come out with the Visuals
The festive spirits of Christmas are often visually symbolized by red and green colored decorations and magical pictures of the winter wonderland. You can add the pictures to your FB posts which can tie the theme with the content that you are posting over the season.
3.    Share the sweet storyline
You can use the art of storytelling in the festive season by telling heartwarming tales that can allure the readers into the Christmas spirit and insist them to join the experience.
You can also share your story through blog mode, interview features, a series of pictures or even a brief captions. The key element is brand cohesion and its anatomy that welcomes your audience in.
4.    Utilizing important dates
In the time of holiday season, the Christmas, New Year, and Thanksgiving are not the only events. You should be aware of the trending dates like National Cocoa Day, which you can utilize to gear up the involvement on FB.
5.    Involve with your followers and viewers
If you are already engaged with your fans, then you can bring the Christmas cheers into a more personalized way. You can utilize the social listening tools such as Sendible for keeping track of people mentioning your brand so that you can retort quickly.
6.    Haul up the holiday spirits by operating with local business
There are numerous ways to share deep affection during the holiday season. One of the ways is to engage with the business in your local area to make something magical. This can be an event, product, or charity sponsorship.
7.    Launch a knowledge sharing campaign with the hashtag
A unique hashtag can permit you to search and get involved with participants swiftly as well as monitor your results. You can select a hashtag that is festive and fun and also representing your brand or campaign. You can also answer the FAQs (Frequently Asked Questions) or publish some lesser-known data about your brand.
8.    Conduct a photo competition
You can amicably hold a photo competition so that it can engage your one of the products or your niche market. You can post branded pictures o Instagram and circulate it throughout the time of competition. The winner can win a prize ranging from a free product or service of your brand to a discount on your blog!
Billy Mark is a Microsoft Office expert and has been working in the technical industry since 2002. As a technical expert, Billy has written technical blogs, manuals, white papers, and reviews for many websites such as office.com/setup.

Source : https://manage-offiice.com/best-social-media-marketing-tips-for-this-holiday-season/ 

Wednesday 19 December 2018

How to Troubleshoot “Xbox One Controller Won’t Turn On” Problem?

We all know that nothing can take us out of the game faster than an Xbox One Controller, sometimes that won’t turn on. However, these controllers are quite strong and powerful, but they do stop working from various numbers of reason.
Users are experiencing some problems which stop an Xbox One controller from turning on or might require professional repairs, or at times, it requires from you to buy a replacement controller, but there are many things that you need to check out here and also, you can fix them by yourself.
Below we provide you common reasons of Xbox One Controller won’t even turn on and how you can easily fix them.
Causes an Xbox One Controller Won’t Turn On
Some most common causes that prevent Xbox One controller from turning on are as follows:
  • Batteries or batteries contacts.
  • Charge and Play problems.
  • Firmware problems.
  • Internal faults.
However, some of these are fixed in the home by you, but some need professional help, as you can not solve them.
Though there are different methods to fix this issue, here we provide you two simple methods with a stepwise guide to fix this issue, but we recommend you start following the steps in a given sequence to avoid trouble and damages.
Steps to Fix Xbox One Controller Won’t Turn On
Method-1: Check Xbox One Controller Batteries
Whenever your Xbox One Controller fails to turn on, then probably there is some issue with the batteries. The batteries might be dead, installed inappropriately, or sometimes failing to charge due to some reasons.
Below you can check that whether your batteries are creating a problem, here how to it:
  1. First, remove the battery compartment located on the back of your controller.
  2. Then, check the orientation of the Xbox One controller batteries.
  3. After that, remove the batteries, and ensure that they were inserted in the correct
  4. If it installed incorrectly, then put them back in the correct direction, or if they were installed correctly, then you need to install a pair of new batteries.
  5. Lastly, replace the battery cover and again try to turn the controller on.
Method-2: Charge and Play Problems
The charge and play kit is extremely convenient for all the Xbox One users. As we already discussed that due to some issues that can cause to prevent an Xbox Controller from turning on. Sometimes, the controller won’t turn on if the cable is damaged and unable to charge the battery.
Here you can easily identify and fix the issue with Xbox One controller charge and play kit. Here how to do it:
  1. Initially, unplug the charge and play cable from your Xbox One, and again plug it into a different USB port on your Xbox One.
  2. After doing this, if still, the controller won’t turn on, then you have to disconnect charge and play cable and try using a different micro USB cable.
  3. If still, it won’t turn on, then remove the battery cover on your controller.
  4. After that, remove the charge and play battery and inspect it for damage.
  5. Now, insert AA batteries, and once check it if the controller turns on or not.
Billy Mark is a technical expert who writes about productivity suites such as Microsoft Office. He writes blog posts, reviews, instruction manuals, news releases, and technical descriptions at mcafee.com/activate

Source : https://billymarkblog.wordpress.com/2018/12/19/how-to-troubleshoot-xbox-one-controller-wont-turn-on-problem/ 

How to Fix Windows Update Error Code 80072EE2?

Whenever you are trying to run Windows Update, but suddenly you get an error code 80072EE2 on your screen. Generally, this error occurs due to corrupt or outdated drivers are stuck on your system, or incorrect configuration etc. so before start working, you just need to confirm that your internet is working on the system since it always need to connect to the Windows update servers to push all the updates back into your computer.
So here we will discuss complete stepwise guide which will help you in resolving the Windows Update Error Code 80072EE2. Steps are very easy and simple to understand, but try to follow these steps in the given sequence to avoid trouble, and it takes less time and fewer efforts. The steps are discussed below.
Steps to Fix Windows Update Error Code 80072EE2
One of the best working solutions for this error is to change the registry and delete some keys. However, all users might have the registry keys in their system as they are using Windows in a home-based environment. This initially signifies that home users will not have the key. But before continuing with steps, once confirm that you have created a restore point if in case something goes wrong. Here is how to fix it.
Method-1: Run Windows Update Troubleshooter
  1. Click the Windows + I keys simultaneously to open the Settings.
  2. Then, click on the Update & Security icon.
  3. After that, from the left side menu, choose and click on the Troubleshoot option.
  4. Now, click on the “Windows Update” located under the Getup and running heading section.
  5. Once Troubleshooter starts, follow the on-screen instructions carefully to run the troubleshooter.
  6. If asked, then give administrator access, for this click on the “Try troubleshooting as an administrator” option.
  7. Then, click on the Apply
  8. Lastly, click on the OK and close all the Windows.
  9. Finally, restart your computer to save all the changes.
Method-2: Rename the SoftwareDistribution Folder
  1. Click the Windows + X keys together on the keyboard.
  2. Choose the “Command Prompt (Admin) option.
  3. Now, type the below-given command in the Command box to stops the Windows Update Services and then press the Enter key after each of them:
  • net stop wuauserv
  • net stop cryptSvc
  • net stop bits
  • net stop msiserver
  1. Again, type the given command to renames the SoftwareDistribution Folder and then press the Enter key:
  • ren C:\Windows\SoftwareDistribution SoftwareDistribution.old
  • ren C:\Windows\System32\catroot2 catroot2.old
  1. Lastly, type the following command to start Windows Update Services and click on the Enter key one by one:
  • net start wuauserv
  • net start cryptSvc
  • net start bits
  • net start msiserver
  1. Finally, restart your computer system to save all the changes.
Hopefully, the steps mentioned above will surely help you in solving this Windows update Error code 80072EE2.
Billy Mark is a technical expert who writes about productivity suites such as Microsoft Office. He writes blog posts, reviews, instruction manuals, news releases, and technical descriptions at office.com/setup

Source : https://billymarkblog.wordpress.com/2018/12/19/how-to-fix-windows-update-error-code-80072ee2/ 

Monday 17 December 2018

Easy Tricks to Fix “Boot Configuration Data File is Missing” Error in Windows 10


Are you facing "Boot Configuration Data File is Missing" Error in your Windows 10, don’t usually panic such error codes appear when the Boot Configuration of your windows is corrupted or damaged internally or externally. Such error code occurs when your system is unable to boot
 When you receive such an error code, it gives you an option of recovery tool or attaching a media like USB or DVD to recover your Windows. Generally, this means your boot drivers are corrupted or have crashed, so to recover it you may have to reinstall the boot drivers to reconfigure your Windows. By reconfiguring your device, no data is lost or affected adversely but to rectify this error you need windows 10 Installation media in your USB or DVD.

  
Billymark -  Technology master

Different measures to Fix BCD error.
 We can use various measures to fix such an issue as given below

Method-1: Windows Installation Media

Such error occurs when Windows can’t boot anymore, so you are unable to use the Visual BCD Editor to rectify this issue. We need to access the advanced startup like Windows 10 or System recovery options like Windows 7. We need to implement several commands from command Window; we can also use Windows Installation Media to access the recovery options.

Method-2: Repairing BCD Error with an Installation CD

1.        Boot your computer system and insert Installation drive
2.        Go to repair option >Select “Advanced options” > Open “Command Prompt.”
3.        After opening the command prompt Enter the Commands
·        bootrec.exe/fixmbr
·        bootrec.exe/fixboot
·        bootrec.exe/scanos
·        bootrec.exe/rebuildbcd

Method-3: Rebuild BCD Store by using Bootrec.exe tool

You can use the Rebuild tool if other measures fail to boot the Windows. To use Bootrec.exe you need to access BCD store from where you can launch Bootrec.exe in Windows recovery environment. Sometimes you have to recreate BCD store to do that follow these steps
·        Bcdedit/export C:\BCD_Backup
·        ren c:\boot\bcd bcd.old
·        Bootrec /rebuildbcd
After that create portions from the total space and create new disks.

Method-4: Clear Dick drive completely

It is only recommended if the other options fail to work as after clearing the entire disks your data will be completely lost. So it is up to you if you prefer this or not. To delete disk follow these steps
1.        Select “diskpart.”
2.        Select “List disk.”
3.        Click on “disk n” (n refers to the number of disks you want to delete)
4.        Select “clean.”
5.        Select “exit.”

Method-5: System Recovery Drive

You can fix your computer Boot issue by following steps.
1.        Plug in your system recovery drive
2.        Boot your system
3.        Select “Command Prompt”
4.        Select “Administrative Command Prompt”
5.        Replace c with the drive in which you have plugged in your drivers( bcdboot c:\windows)
6.        Create a new partition from the old BCD boot file
7.        Remove the System Recovery Drive
8.        Reboot your computer system
By using these simple steps, you can get your system error-free and again start using your computer normally.


Billy Mark is a technical expert who writes about productivity suites such as Microsoft Office. He writes blog posts, reviews, instruction manuals, news releases, and technical descriptions at office.com/setup
Source : https://billymarkblog.wordpress.com/2018/12/18/easy-tricks-to-fix-boot-configuration-data-file-is-missing-error-in-windows-10/

Thursday 13 December 2018

How to fix Error Code 0xc0000005 on Windows 10?


One of the problems you might face on windows 10 is the error code 0xc0000005. It can occur due to multiple of reasons, like corrupted files, malware hardware or damaged RAM. Such errors are not much infrequent on windows based operating systems. So you can easily get rid of them.

But before understanding how to fix such error let us understand that why such errors occur in first place.

During accessing a software
Error code 0xc0000005 can appear while accessing new programs like Google chrome or Photoshop, or any other software. As such error occurs due to unfinished DLL files or unsigned DLL file reinstalling it won’t fix the issue.

During Location or Data Access
The user may encounter with such error while normal functioning which could corrupt any of your files, it could be due to damaged RAM, virus attack, faulty update or others. Such an issue should be dealt with as soon as possible as it can also result in data loss.

As we now understand the problem let us focus on the solution to this error code.

Repairing your Registry
Corrupt files in the registry can severely harm your computer and can lead to the generation of error code 0xc0000005. If you have created a registry backup one should restore the backup to solve the problem. Although before doing so, one should understand that restoring your registry is a complex and sensitive task. Even a small wrong or faulty step can lead to serious issues for your system.

Conduct an SFC scan on your PC

Sometimes an error occurs due to corrupted computer files. To solve this issue, you can conduct a System File Checker. To conduct an SFC scan, you can folly these steps.
Go to search option on your taskbar.
Search “cmd” in the search option.
Use Right-Click on command window from the results. Then select Run as Admin from the options window.
Go in a command window and type “sfc /scannow” and press enter. It will repair any corrupt files present in the system.

Review system RAM
Possibly you are facing this error due to a damaged RAM. But before coming to any conclusion rectify that the error is generated due to it. The best way to check it is by replacing old RAM with a new one. First, you need to shut down your pc then remove old RAM and replace it with a new one and then restart the computer. If the error code is gone, then your previous RAM was damaged or corrupted.

Review your Drivers.
Always make sure when drivers in your system are updated, always restart your system as to give your system chance to analyze and verify new drivers. It is possible that drivers may not communicate properly with your system which can lead to the error code. You can use your device manager software to search for new updated drivers for the smooth functioning of your system.

Billy Mark is a Microsoft Office expert and has been working in the technical industry since 2002. As a technical expert, Billy has written technical blogs, manuals, white papers, and reviews for many websites such as office.com/setup.

Source : https://office-setup.net/how-to-fix-error-code-0xc0000005-on-windows-10/

How to erase history in iPhone or iPad


When you use daily searches on Safari for the various reason, then your iPhone records a lot of web pages history you’ve visited, and this makes your iPhone a little slower. Besides if you don’t clear your browsing history on iPhone X, then you’re searching history might be checked by others, which they shouldn’t due to privacy disclosure. Therefore it’s advisable to delete your browsing history from time to time to make your iPhone work smoothly. Here are the following steps:

Erase history by going to Settings
1. Access your iPhone X, go to Settings.

2. Scroll down, and you’ll see safari, click on it.

3. Scroll down and you see “Clear History and Website Data” and then press on it, you’ll get an alert on clearing will remove history, cookies and other browsing data. Press on “Clear History and Data”.

Erasing history on iPhone X is the most effective methods to make your iPhone faster.

Erase history within Safari
1. Go to Safari, Click the “Bookmarks” icon in the toolbar

2. Hit the “Bookmarks icon” in the upper left side of the corner.

3. Ensure that you’ve returned to the top level menu by clicking on any back arrows in the upper left side.

4. Press the History menu

5. Press Clear and tap how much history you’d to clear, you can delete your last hour history, or you can last 48 hours or all the recorded history at once.

We hope this article helps you in clearing your browsing history on iOS.

Billy Mark is a creative person who has been writing blogs and articles about cybersecurity. He writes about the latest updates regarding mcafee.com/activate and how it can improve the work experience of users. His articles have been published in many popular e-magazines, blogs, and websites.


Source : https://mcafee-help.me/how-to-erase-history-in-iphone-or-ipad/

Tuesday 11 December 2018

How to Fix Error Code 0x8500201d?


Some Windows 10 users are facing issues with their Mail App on their system. When this error occurs your Mail App stop receiving emails, and it cannot sync the account configured on the app, and it shows an exact message on your screen is “Something went wrong; we can’t sync right now. Error code: 0x8500201d.”
Suddenly, when you stop receiving emails on your Windows Mail App, then there are chances that it can’t sync with your account. This error message states that the Windows Mail App is having issues with syncing your mail account. This 0x8500201d occurs because of a simple incorrect account configuration.
Here we have compiled a few methods to fix this error code 0x8500201d we can’t sync right now. But we suggest you that use these methods in an ascending order to avoid trouble and also save your time.
Steps to Fix Error Code 0x8500201d

There are few simple methods which help you in fixing the issue. But before going through the process, we want to warn you that you need to create a restore point. Unluckily, if something goes wrong, then it will save your important data. Here are a few methods:
  • Check your PC date and time is correct.
  • Re-enable mail syncing.

Method-1: Check your PC Date and Time is Correct
  1. Firstly, click on the date and time option located on the taskbar.
  2. Then, choose “Date and Time” settings.
  3. Now, click on the “On” tab to start the “Set Time Automatically.”
  4. Alternatively, other than Windows 10 users, click on the “Internet Time” option and then tick mark on “Automatically synchronize with the internet time server” option.
  5. After that, choose Server “time_windows.com” option.
  6. Next, click on the Update option.
  7. Then, click on the OK option.

Note: you don’t need to wait to complete update. Just click on the OK tab.
Once you completed the process, setting the correct date & time should fix the error, but if you still facing the issue or issue not solved then continue trying next methods.
Method-2: Re-enable Mail Syncing
  1. First, type “Mail” in the Windows Search bar.
  2. Then, click on the first result which is Mail (Windows Apps).
  3. After that, click on the Gear icon (Settings) in the mail app.
  4. Next, click on the Manage Account option to see all your email accounts configured under Windows.
  5. Click on the one option which having the sync-related problem.
  6. Now, click on the “Change mailbox sync settings” option.
  7. Lastly, disable the sync option and close the Mail App.

  8. After disabling the sync option, your account will be permanently deleted from the Mail App.
  9. Again, click to open the mail app and click on the re-add the account option.

   Billy Mark is a technical expert who writes about productivity suites such as Microsoft Office. He writes blog posts, reviews, instruction manuals, news releases, and technical descriptions at office.com/setup

Source : https://manage-offiice.com/how-to-fix-error-code-0x8500201d/

PUBG Mobile 0.14.5 Update With Royal Pass Season 9

PUBG Mobile Players received a ‘minor update’ on Thursday, and the latest 0.14.5 update brings the latest Royal Pass Season 9. It include ...